Who Am I? And Why Am I Here?

Elewys of Finchingefeld, GdS, JdL
Barony of Aquaterra, Kingdom of An Tir

This is a place to which I may post my research, my experiments, my successes...and yes, my failures...for medieval re-creation and research on my never-ending quest to learn and revel in knowledge and experiences.

I am a lady of many times and many places. Currently using a 15th century English name, dressing in a 10th century Danish dress, and camping in a Mongolian round house. "Lost" doesn't even begin to describe my persona.
Showing posts with label Kingdom A&S. Show all posts

Monday, March 10, 2014

Beads and Weaving Update

I've made a bunch of beads lately.  This set of 10 (11) were made for my dear friend, Heide, who wanted to make bracelets for her sister and mom.  Heide grew up on a cranberry farm near Aberdeen, so when she saw the first bead I made, she said "CRANBERRIES!" and commissioned 10.  I was happy to make them for her and threw in the 11th bead free!  OK, technically it was the first bead, and it wasn't the prettiest, but she loves them anyway.
Portrait: Reasons to be thankful... 1. Nobody was hurt in the wreck today.  2. The accident was NOT my fault and knowing I did everything possible, and had I not locked up the brakes and turned the wheel it could have ended badly. 3. My parents surprised us by showing up early.  They didn't stay long though, as they were on their way to White Salmon to stay with my Aunt Kathy and Uncle Wayne Stone. 4. They brought the girls about 50 pounds of fabric for costuming and so they could learn how to sew (that is a piece of linen from the lot under the beads in this picture).  5. The beads!  These are special beads I commissioned from Karen that feature cranberries and cranberry vines. 6. Brian cooked a lovely dinner tonight. 7. We are home, safe and cozy for the evening.
Then I was messing around with different colors and techniques, tools, and trying out some stuff with clear glass.  I don't particularly care for working with the clear stuff--it seems to need a lot more heat and takes longer to melt.
  This one I call the Diversity Bead.  :)
Portrait: Experimenting with color combinations. .. Then doing a tried-and-true red, white and black combo.    

I love the chemical reaction I had with these two colors--I need to get more turquoise.


I finally got the weave done--it's so lovely!  I don't know what I'm going to do with it...although I think it'll end up on an apron dress.

Since the loom was now free...I warped up some yarn on the inkle loom to make the band for Frigga the Loom.  I'm thinking I need to get it on the rail and start attempting to weave.  I need to figure out where to set it up in the house--probably the front room, but I need to rearrange some furniture first.

A few weeks ago, I was greatly anticipating entering Kingdom Arts & Sciences in 2015 with my warp-weighted loom--something I had never seen anyone work with in An Tir.  Last weekend was the Kingdom event and I started eagerly looking at some of the entries that starting appearing on Facebook.  I was a little discouraged to see an entry this year that included...yes, a warp-weighted loom.  My first reaction was "dang it!  I wanted to be first!"  Then it was, "Now it's going to look like I'm copying."  It was, admittedly, a little disheartening.  Now, the loom she used was for card weaving, not for fabric, but still, I felt like someone had stolen my master plan and built it faster and presented it.  I had a nice chat with my Foster Laurel (whose identity shall remain a mystery for now)...she has been a great sounding board when I have questions or get discouraged on my Artisan Journey (let's not say Laurel Track...who the hell knows where this journey will end?).  I relied on her greatly when I had a personal issue with another member, when I had frustrations with a judging panel, and yesterday, when I was stung by the surprise of someone else doing stuff with the loom.

After she talked me down off the ledge, and I had a night to sleep on it, I realized that my journey and her journey may cross paths, but we are on different journeys.  Hers was to do card weaving on a warp-weighted loom; and mine is to make a sheep to shawl project.  I even have the sheep!


Many thanks to HL Godith of Goosefoot Mead for providing this bag of goodness!  This award-winning fleece needs to be washed, carded and spun and will -- hopefully -- be a finished garment someday.  

Away to bed...long day tomorrow!  I have two quilts to finish for other people, and on Friday, I get to pick up two more.  In the meantime, I have 7 to do for myself.  Gaaaaahhh!

G'nite.

Saturday, February 1, 2014

Loom Day Two: Frigga lives!

Made some progress on the loom, which may seem like little things, but it took some ingenuity to engineer it to work the way I need it to...still need to make some adjustments, as you will see.

Here the crotches are screwed onto the uprights.

This is my first go at the heddle support rods.  I needed to adjust the shape of the Y where the heddle rod will rest--the first attempt, the heddle rod will barely stay in place, but one nudge and it'll fall.  I looked at a couple looms and came up with an improved shape.  Now the heddle rests comfortably on there--no risk of falling off.

Here it is set up!  I knew it needed just a couple more minor changes before it is ready to warp!

I found (again) and started watching the Sami/Norwegian video of a woman who was demonstrating how to set up the loom, starting with a woven band with weft threads that become the warp threads of a woven piece.  I have a bunch of Fisherman's wool that was given to me recently and this will be a great project to use that yarn.  I think I'd like to try this...

One of the things that I realized, however, is that the woman in the video is weaving on a loom where the top beam is at her head level.  The more I thought about it, the more it made sense.  Anything out of reach is just silly, so I decided late today that the loom needed to be shorter.  I unscrewed the crotches and top support and chopped another foot off the top.  I reassembled the pieces; now the top beam is sitting at about 62" instead of a ridiculous 78".  Now she feels right.  Maybe it seems weird, but she feels alive!  She even told me her name.  Frigga.

First, though, I need to finish weaving the Perle Cotton piece I have on my inkle loom.  Better get on it!

Friday, January 31, 2014

Because I Couldn't Possibly Wait for Summer...

...I went ahead and started on building the warp-weighted loom project today.  I consulted a BUNCH of web sites and looked for sources (books) that I could look to, but the newest books on warp-weighted looms is dated from the late 70s.

Broudy, Eric. The Book of Looms.  Brown University Press, 1979.
Broholm, H.C. and Hald, Margarethe. Costume in the Bronze Age in Denmark. Arnold Busck, 1940.
Hoffman, Marta. The Warp Weighted Loom. Robin and Russ Handweavers, 1974.
Trychkare, Tre. The Viking. Carver and Co., 1966.

Yeah.  And I looked for the Hoffman book, just out of curiosity.  I can get a used copy for $133.  Not happening on my budget.  I'll have to see if the Everett Public Library can get me a copy on inter-library loan.  There appear to be a couple of newer magazine articles, so I'll seek those out as well.  

There are a lot of web sites with some research (most based on the sources above) plus looking at extant pieces and experimenting with building their own.  There are differences with all of them, so other than the basic structure, there is a lot of room for experimentation and setting things up so it'll work for you.  I still need to do a little more research on weaving in general--I've only done inkle and card weaving, but this seems to be just a giant inkle loom.  There are possibilities for doing multiple sheds, though--this one I'm setting up to be a 4 shed loom, although the first couple of projects will be 2-shed only.  

Here is my process to building the prototype:
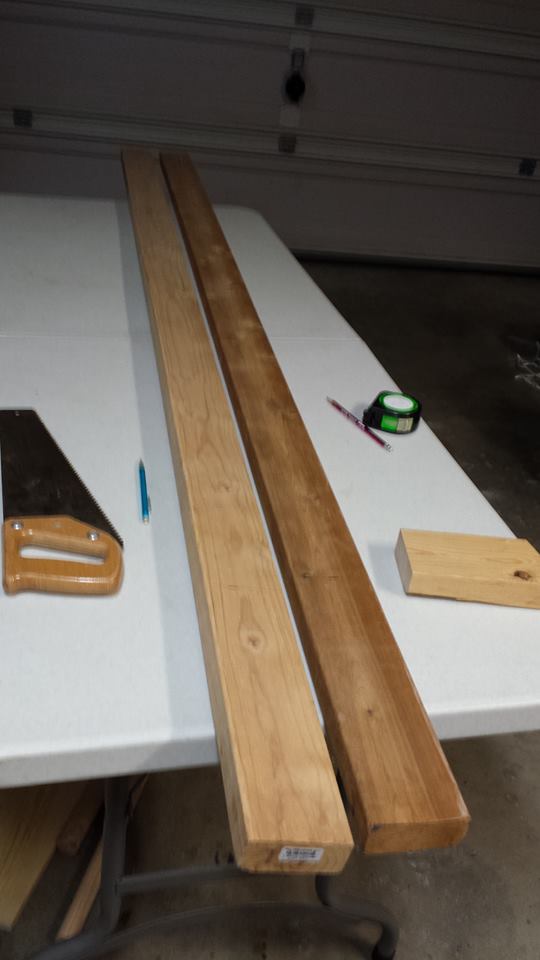
1.  Take two 2 x 4s--I would recommend using two hard wood boards for a "finished" look, although Douglas Fir is certainly more economical and lighter for transport...I grabbed two boards from the rafters, only to realize later that the darker board was, in fact, cedar.  Whoops!

2.  Cut two 2 x 4s to 7 feet long (84").  Other directions said keep the 2 x 4s at 8 feet long and use a stool to reach when weaving.  To that I say, "NO SIR!"  I'm clumsy enough and being only 5 feet tall, I don't need to risk injury.  Again, this is a prototype, so if it needs to be taller after experimenting with it, I can make it so next time.  I doubt it, though.  In fact, I'm thinking that I might be able to make it even shorter by cutting the bottom down another 6".

3.  Next, you take those 12" pieces that you cut off and make the "crotches".  These are the pieces that the top beam rests in while you weave.  It needs to be deep and wide enough for the rod to rest in.  Some directions suggest that you make it vaguely "S" shaped.  Vague, indeed.  Seems mostly stylistic, although the thinner end at the bottom makes it easier to attach to the boards with long screws.  These were shaped using the band saw...I love that toy!

4.  Here the rod is resting in the crotches.  The bottom of the crotch is 16" down from the top.

5.  The next step was about creating the shed rod.  The top beam and heddle rod I bought were 5' long, which determined the width of the frame.  60" long, taking away 4" on each side for overhang, I cut the shed rod 52".  I drilled one hole through and secured it with a bolt and wing nut.  These are meant to be taken apart for transport to events.  I also cut a thinner piece of wood for the top of the frame, simply for stability.  Similarly, I screwed it together with wing nut and bolt (they're WAAAY too long--I'll have to get shorter bolts the next time I'm out at the hardware store).

6.  Here she is, standing up!  I'm naming her Frigga, after the Goddess of weaving and wisdom.  There are a few more steps to complete my girl, but it's wintertime and it was just a few degrees above freezing outside.  

Frigga still needs heddle rods, heddle rod supports, and weights.  The heddle rods can be scavenged from scraps leftover from the yurt project.  They don't need to be particularly heavy and I have 3/4" sticks that are more than long enough.  I looked for pieces of 7/8" dowels at the hardware store, but they only had 4-foot lengths...I need 5 feet.  Figures.

The heddle rod supports will be shaped from scraps in the bin.  They need to be about 8-10" long and Y shaped.  I can use the band saw again and carve down the point to fit into the holes I'll be drilling on the frame.

Weights are going to be time consuming.  Some other weavers have used 1-pound bags of sand or stones for weights instead of clay circles.  I may go that route, also.  I'm also thinking that I may need to create some kind of support to make it free-standing and perhaps more stable.  This will be a blast to take with me to Ursulmas next year!

More work tomorrow!

Thursday, January 30, 2014

A&S Plans Set in Motion

I've made quite a few beads!  Some are really nice!

And some are pretty ugly...they are rather experimental, so don't abuse the artist too much.  I was trying to make some Islamic Folded Beads, but found that they are tediously long to build and don't always turn out right. In other words, my skill level is not yet up to that standard.

I started another technique that involves using a pointy tool, much like a dental tool, but thicker and stronger.  I made the core of the bead then added stripes and dragged the tool over the surface of the glass, deforming the stripes, which looked very much like the folded beads, and took a fraction of the time.  Many of these turned out pretty cool, but others didn't do as well...a bit lumpy and coarse.  One had a fatal flaw that caused...well...

...sudden bead death.  I didn't get this one into the vermiculite fast enough, so it cooled down too quickly, causing stress fractures.  I could glue it back together, but there's no telling if other fractures might appear later.

The perle cotton tablet weaving is coming along.  I have about a yard done so far on this particular piece.  The threads are pretty fine (#8 DMC perle cotton, found at any fabric or craft store) and slick, which makes the cards turn so smoothly...like buttah!  The cost of materials is a bit higher, but not astronomically high.  We're talking about $12-15 spent for this project so far...maybe more if I need to use another $3 skein of thread for weft...instead of $5 for an entire project.  Yeah, it's about triple or quadruple, but still cheap for what it is.

My plans in the not-too-distant-future (say, summer) is to build something like this:
warp-weighted loom
It goes with my sheep-to-shawl plan.  You know...take the fleece from the sheep and turn it into a wearable garment.
1.  Make loom.
2.  Spin fibers.
3.  Weave into cloth.
4.  Full cloth.
5.  Make something from cloth, like a 10th century Danish apron dress.
If I can finish all that by next January, I can enter things into Kingdom Arts & Sciences.  I was told (by a supportive Laurel friend) to enter three things:  loom, woven stuff and beads.  I think I can do it...but I'm going to have to do some serious work over the summer.

This goes well with the advise I received from *another* Laurel friend, who said to stay within a particular scope of time/culture when you enter Kingdom-level contests.  In her experience, being "all over the map" doesn't show as well as being a bit more focused.

I'm thinking I should build a prototype of the loom first; try to build it out of really cheap materials, like 2" x 4" and 1" x 2", then make a more 'natural' product out of cut trees.  I can't even imagine what I'd need to do to cull trees from the neighborhood or out in the wilderness somewhere.  Maybe someone in the SCA has a piece of property they're willing to let me cut a tree from.  First things first...build the prototype.