Who Am I? And Why Am I Here?

Elewys of Finchingefeld, GdS, JdL
Barony of Aquaterra, Kingdom of An Tir

This is a place to which I may post my research, my experiments, my successes...and yes, my failures...for medieval re-creation and research on my never-ending quest to learn and revel in knowledge and experiences.

I am a lady of many times and many places. Currently using a 15th century English name, dressing in a 10th century Danish dress, and camping in a Mongolian round house. "Lost" doesn't even begin to describe my persona.
Showing posts with label Advanced Card Weaving. Show all posts

Friday, March 13, 2015

Weaving and Recuperating

It's been a little while since I did any posts, so I guess I have some catching up to do!

Most recently, I did a commission piece for my old friend, Don Miguel.  He's constructing a new Elizabethan outfit and wanted a little something to add to the garment--something hand made by a friend is always better than factory made by a stranger.


This is a 2 yard piece and I hope to get it to him soon!


After finishing up a couple quilt projects and helping the middle kid with Girl Scout cookie sales, I started this very tiny, delicate trim from Applesies and Fox Noses.  This one is called "Bee Feet" and will be 4 yards long when complete.  It's made from size 10 perle cotton--the kind you can get by the spool at any craft store (Michael's, Joann's, etc.).  I ended up using 2 spools of each color for the 16 cards.  The weaving itself is only 1/2" wide, is very silky and flexible.  This will be great for trim for a tunic.

I have a great desire to work on some beads or some spinning on my new wheel...and of course, I'm laid up with an infection on my leg.  I'm supposed to keep my leg elevated and I'm taking some serious antibiotics and anti-inflammatories, and it's difficult to do any kind of arts with my feet up.  Knitting...but I'm not really feeling like knitting, and keeping a pattern nearby...never mind.  I'll blog and check Facebook.

 Hopefully I'll be back to normal in a few days.

Tuesday, February 17, 2015

Applesies #10: Diamond Applesies

This is one of those patterns that I will need to follow the pattern, step by step, all the way to the end.  This is not an easy repeating pattern that can be memorized...at least by me.  It's the last of the "easy" patterns...I'm thinking this probably should have been included in the next section.

I had a lot of difficulty choosing colors for this one, but finally settled on navy blue with a blue-grey background and a border of red and rust-orange.

So once you warp up your loom, you will start rotating your cards starting from the BC position.  Your cards will be facing right.

Cards 1-3 and 20-22 will always be turning forward.
Turning sequence is:
First:  1-3 F; 4 B; 5-6 F; 7-9 B; 10-13 F; 14-16 B; 17-18 F; 19 B; 20-22 F
Second:  1-5 F; 6-8 B; 9-14 F; 15-17 B; 18-22 F
Third:  1-4 F; 5-6 B; 7-16 F; 17-18 B; 19-22 F
Fourth:  1-3 F; 4-5 B; 6-17 F; 18-19 B; 20-22 F
Fifth:  1-3 F; 4 B; 5-6 F; 7-16 B; 17-18 F; 19 B; 20-22 F
Sixth:  1-5 F; 6-17 B; 18-22 F
Seventh:  1-4 F; 5-18 B; 19-22 F
Eighth:  1-3 F; 4-19 B; 20-22 F
Ninth:  1-3 F; 4-19 B; 20-22 F
Tenth:  All forward
Eleventh:  All forward
Twelfth:  1-3 F; 4 B; 5-18 F; 19 B; 20-22 F
Thirteenth:  1-3 F; 4-5 B; 6-17 F; 18-19 B; 20-22 F
Fourteenth:  1-4 F; 5-6 B; 7-16 F; 17-18 B; 19-22 F
Fifteenth:  1-5 F; 6-17 B; 18-22 F
Sixteenth:  1-3 F; 4 B; 5-6 F; 7-16 B; 17-18 F19 B; 20-22 F
Seventeenth:  1-3 F; 4-5 B; 6-8 F; 9-14 B; 15-17 F; 18-19 B; 20-22 F
Eighteenth:  1-4 F; 5-6 B; 7-9 F; 10-13 B; 14-16 F; 17-18 B; 19-22 F

See what I mean?  I can't memorize this.  I was told that you look at the pattern and that will tell you how to turn the cards...it's a lovely pattern...it's just going to take some extra time.

The back is EXTRA cool!


Sunday, February 15, 2015

Applesies #8

Took a step back (or turned a page back) and started Applesies #8 while visiting with my delightful MIL on Valentine's Day.  Hubby and his dad went out to the movies, and the ladies stayed behind...I didn't have any need to see Jupiter Ascending.  This one is called Fine Crooked Knees with Small Applesies.  Maybe it loses something in the translation from Finnish.  I liked the color combination from the sample in the book so much that I decided to copy it...although I used Navy blue instead of black, but otherwise it's the same.

The turning sequence is as follows:
* with cards A-D on the top, cards 1-9 back, 10-14 forward (x 3)
* all cards back one quarter-turn
* cards 1-5 forward, 6-14 back (x 3)
* cards 1-5 back, 6-14 forward (x 3)
* all cards forward one quarter-turn
* cards 1-9 forward, 10-14 back (x 3)

Now, if you want to have lovely, tidy edges, you could turn cards 1, 2, 13, 14 forward always, then reverse direction when it gets over-twisted.


Tuesday, February 10, 2015

Applesies #9

United Chicken Runs is weave #9 and while I wanted to do #8, I saw this one and went...oooo!

SO, again, while I can't disclose the threading because it's *in the book* (which, if you are still reading my blog with interest, you should *totally buy*!), I will explain the turning sequence.

Cards 1-3 and 16-18 need to turn forward all the way through...or switch to turning backwards after it gets too twisted up.
While that's going on, cards 4-15 will turn back for six turns.
Then 1-3 forward, 4-7 will turn back, 8-11 forward, 12-15 back, 16-18 forward for two turns.
1-3 forward, 4-5 back, 6-13 forward, 14-15 back, 16-18 forward for two turns.
Then mirror...
1-5 forward, 6-13 back, 14-18 forward for two turns.
1-7 forward, 8-15 back, 16-18 forward for two turns.
All forward for 6 turns.

That's the whole turning sequence!


3 1/2 yards finished.

Diagonals....Defeated by Dragons

This is a moment of sincere frustration.  I found a very cool Dragon Heads pattern called "Dragehoveder" on the Historic Tablet Weaving Facebook page, but despite several attempts, verifying the threading, varying the turning sequences, and a lot of cussing, I finally decided that this was not going to happen.

The threading isn't very difficult...it's all dark-light-medium-light...


I struggled with it for hours...literally...weaving, unweaving, cutting it off, trying again.


I didn't like having the orange-brown in it, either, so I replaced it with white (or rather shifted the grey to the "medium" color and made white the "light" color).  After nearly throwing the loom across the room a few times, I abandoned the idea and made Egyptian Diagonals instead.


It came up to just under 3 yards, which is a yard shorter than my usual trim lengths.  That's how much loss I had in attempting to make the dragon heads work.  Grrrrr...

Now, if you want to do Egyptian Diagonals, it's fairly easy!  So here's now it's done...

First, thread your cards (I used 14 in the project above)
Egyptian Diagonals
1
2
3
4
5
6
7
8
9
10
11
12
13
14
A
 Grey
 White
Navy 
 White
Grey 
White 
Navy 
White 
Grey 
White 
Navy 
White 
Grey 
 Navy
B
 Navy
 Grey
White 
Navy 
White 
Grey 
White 
 Navy
 White
 Grey
White
 Navy
 White
 Grey
C
Grey 
 White
 Grey
 White
Navy 
 White
Grey 
 White
 Navy
White 
 Grey
 White
 Navy
 Navy
D
Navy 
 Navy  White  Grey  White  Navy  White  Grey  White  Navy  White  Grey  White  Grey

OK...Now that it's all warped up, get your weft anchored and turn a few passes forward to get the tension all good.  Sorry...all my words went away and I'm brain.  

Each turn is a quarter-turn.  After each quarter turn, throw the shuttle.  Each turning sequence will be done twice.

So, turn all cards back and throw the shuttle.  Repeat. 
Turn cards 1 and 2 forward, 3-14 back a quarter turn.  Repeat.
Turn cards 1-4 forward, 5-14 back a quarter turn. Repeat.
Turn cards 1-6 forward, 7-14 back.  Repeat
Turn cards 1-8 forward, 9-14 back.  Repeat.
Turn cards 1-10 forward, 11-14 back.  Repeat.
Turn cards 1-12 forward, 13-14 back.  Repeat.
Turn all cards forward.  

Now you'll reverse stuff...
Turn cards 1-12 forward, 13-14 back.  Repeat.
Turn cards 1-10 forward, 11-14 back.  Repeat.
Turn cards 1-8 forward, 9-14 back.  Repeat.
Turn cards 1-6 forward, 7-14 back.  Repeat.
Turn cards 1-4 forward, 5-14 back.  Repeat.
Turn cards 1-2 forward, 3-14 back.  Repeat.
Turn all cards back.  Repeat.

The problem with this pattern is that the outside cards will be twisted up terribly and the middle cards will twist and untwist evenly.  If you have fishing spinners, this would be the pattern to use them on, otherwise, you will have to untwist your warp several times during your weaving.  Of course, I couldn't find my spinners and had to untwist four or five times.  Time consuming, for sure.

Easy enough?  You can do it!

Monday, February 2, 2015

Colorful Small Applesies

The first pattern in the Applesies book is a fairly simple one-and-a-half pattern...I find this curious.  Did the maker run out of cards?  Or threads?  Or just goof?  Or was this one-and-a-half diamond pattern deliberate?  We'll never know.

The pattern is easy enough.  After threading with the cards facing right--and remember, because this is a book that is currently being printed and sold, you need to buy the book to get the threading directions (I am only providing a little extra help reading the pattern)--make sure the cards are in the A-D position on top.

There are 11 cards in this little weave, and the turning sequence is quite simple.  The outside cards (three on the left, and two on the right) will continue to turn in the same direction--forward.  The rest of the cards will turn three quarter-turns forward, three quarter-turns backward.  Repeat!  Easy as that.

When the twist gets too much on the outside cards, reverse the direction to turn back instead of forward to untwist.  After another yard or so, you may need to switch back to turning forward again.  When you change directions, there will be a little lump of weft on the edges.  It's normal.  Don't worry.  Keep on weaving!


Finished piece--4 yards, about 1/2" wide

Applesies & Fox Noses #7: Tree Climbers

After finishing up the #1 band, Colorful Small Applesies, I started a new project for my dear friend, Bekah.  She chose #7:  Tree Climbers.  It's a four-color band (could be done with 3, but the edging has a two similar light colors that alternate).  


This one is a bit more tricky, but not impossible...after some studying the pattern and experimentation, this is what I came up with:
Turn back all cards – 5 turns
Then turn card numbers:
1-4 back; 5-8 forward; 9-14 back – two turns
1-4 back; 5-10 forward; 11-14 back – 5 turns
1-4 back; 5-6 forward; 7-14 back – 2 turns

When twist is too tight on the outside cards, you can reverse the directions of those cards to untwist…

1-4 forward; 5-10 back; 11-14 forward – 5 turns
1-8 forward, 9-10 back, 11-14 forward – 2 turns
All forward – 5 turns
1-6 forward; 7-10 back; 11-4 forward – 2 turns

The twist on 5, 6, 9, and 10 will continue to build up, so you can either put spinners on those cards or untie and untwist those cards when the twist becomes unmanageable. 

If, instead of untwisting, you want to simply reverse the pattern, you can get a mirror image of the pattern.  If you want to try this, you would use: 

Turn back all cards - 5 turns
1-4 back; 5-8 forward; 9-14 back – two turns
1-4 back; 5-10 forward; 11-14 back – 5 turns
1-4 back; 5-6 forward; 7-14 back – 2 turns
(just like in the first part…but then…)

1-4 forward; 5-6 back; 7-14 forward – 2 turns
1-4 forward; 5-10 back; 11-14 forward – 5 turns
1-4 forward; 5-8 back; 9-14 forward – 2 turns
All forward – 5 turns


Have fun!

Wednesday, January 14, 2015

So I'm Weaving Along...

...on this pattern, that weirdly, doesn't look anything like the image...which is quite possibly a threading issue--I'll have to try this again when I get to the end.  You know what they say--it's not a mistake, it's a new pattern!


...and something goes wrong.

The tension bar on the inkle loom that I've been using for 20 years finally died...the threading inside the wooden bit was not lined with a metal fitting; it's just wood.  So after 1000 yards of trim or so, it stripped out.


I tried to use my cheap-n-scuzzy "surfboard" loom but the tension was unreliable and the bolt chewed through one of my threads.  It was time to move ahead to the next plan.


Not wanting to waste time, I went ahead and built this in two days:


While it's not quite finished, it might work well enough for both tablet weaving and rigid heddle weaving with a few minor alterations.  In fact, I have an idea for a temporary improvement...ooooo....

In the process of building, I had a few set backs during the build...was locked out of some areas of the wood shop...


...but hand-held power tools were available and I made full use of them!

And on the third day...


...I added the front and back bars (only one pictured here, along with, for some inexplicable reason, the broken tension bar from the inkle loom).  I attempted to warp up the card weaving on the loom but didn't have any luck doing so.  Eventually, I gave up because the tension was not consistent.

My dear husband went to the hardware store and in about 90 minutes had fixed the tension bar for the inkle loom, so now I am back in business!  It took a couple hours to re-warp the card weaving onto the loom, then had to take it apart again to adjust the tension again to accommodate the shortened length--this loom really needs TWO tension bars for card weaving.

I still have a quilt commission to finish and a bunch of uniforms to repair, but...you know... I'd rather be weaving. :)

Tuesday, January 6, 2015

Advanced Card Weaving: Birka 12

Here's another fun pattern for you history buffs!  This is Birka find #12
Ткачество на дощечках - Szukaj w Google
This person (Russian, if I figure it correctly) has already mapped out this pattern pretty clearly, it's just a matter of knowing how to read the thing.

Warp your cards like it shows above.  Turn your cards to the AD "home" position.

Turn all the cards four quarter-turns forward, passing the shuttle between each turn.

When you have returned to the home position, you will split the deck.  Turn cards 1, 8-13 forward (away from you); 2-7 back (toward you).  You will do this for three quarter-turns.

Then...reverse!  Turn cards 1-7 forward; 8-12 back; and 13 forward.  You will do this for three quarter-turns, back to the home position.

Repeat the pattern--four quarter-turns forward, then the split pack.

As you can see, this means that the 1 and 13 cards are always turning forward...the rest of the cards will be turning four quarter turns forward at the end of every pattern.  This results in a great deal of twist in the threads, which you will have to eventually deal with.  About every yard and a half of completed weaving, I will untie the knots (one card at a time) and untwist.  It's just the way this pattern works.  I often will turn the 1 and 13 cards with the cards adjacent to them, which still builds up a twist, but not at twice the speed.

Here's mine, in progress...


And finished!

Friday, December 5, 2014

Advanced Card Weaving: Ram's Horn Pattern

I've been watching a card weaving Facebook page and several people have asked about how to do the Ram's Horn pattern.  It's not a beginner's pattern, for sure, but with an understanding of how the cards are set up and turning patterns of the cards, you, too, should be able to produce a lovely woven Ram's Horn band.  Sounds easy enough, right?  Don't worry--go step by step, and you'll have this one by the horns!

Now, it should be noted, for those who are big into the recreationist groups like the SCA, this is not a period piece.  Historically, the only mention I can find is from a web site that reads:  "The Ram's Horns pattern popularlized by Crockett's "Card Weaving" book comes from the 20th century Anatolian (turkish) belts and it has not equivalent in archeological finds."  http://weavedmagic.deviantart.com/journal/Origins-of-most-popular-tablet-weaving-patterns-394709084

So let's get to the full color demonstration of this pattern!  READY?

If you're not sure if you're going to like it, or if you suspect you might get frustrated from trying and pitch it across the room, you may want to try a short piece first. Don't warp up the loomzilla for this first project.  When I first tried this pattern, I did one-yard lengths for each thread, just to test it out.  I ended up getting about a foot done before I knew I needed to do a larger piece!

Supplies needed:

  • 3 colors of carpet warp or crochet cotton thread--I used Maysville 8/4 Carpet Warp.  It's good stuff, heavy duty and will make great belts, bag straps, and heavy trim (it's not delicate and as flexible as finer threads, but a great place to start).
  • 22 cards--mine are the store-bought 3" cards with ABCD labeled in clockwise order
  • 1 loom--I use an inkle loom that weaves up to 4 yards of trim
When choosing the thread, you will need a light color, a medium color, and a dark color.  High contrast is important in this pattern!

You will warp it up with the #1 card on the left; #22 card on the right, reading the pattern just like reading a book.  The next thing to note is that, for this pattern, you should have the top surface of the cards facing *left*.  If you have the cards facing right, the pattern will show up on the bottom side of the weaving.  Also, and the pattern (below) has the rows lettered backwards--D, C, B, A.  (If they were lettered A, B, C, D, you would have to face your cards to the right--good tip to note for when you find future patterns!)

This is the pattern for the dreaded Ram's Horn pattern.


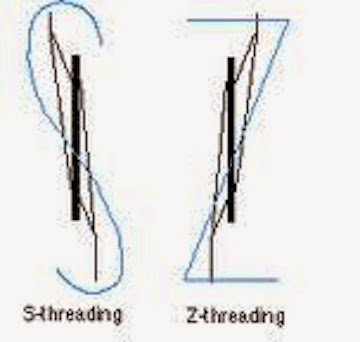
Just a refresher:  Each column in the pattern is marked with S or Z.  Some patterns will be marked with \ for S or / for Z, but since this font doesn't have a significant slant, it can look a bit more confusing, so I've used the letters instead.  Many new weavers get confused about how to do S and Z threading.  This is one of the best diagrams I've found to remind yourself how the threads go through the cards.  

Now you've got the pattern, the threads, the cards, and a refresher on S and Z threading.  Go ahead and thread up your loom...I'll wait.  (I often put in a movie that I've seen a dozen times so I have something to listen to while I work.)

[dooo-do-dooooo...deee-daaah-dee....]


OK.  Now your loom is threaded and you have a shuttle loaded (I recommend using the same color as the thread on the border--in this case, a dark red--to make it blend in, but some people like to make it stand out as an added pattern on the edge.  Your choice!)  Ready to start?  

The pattern alternates between the cards moving together, as a pack, for four quarter-turns, and then some of the cards turning in opposite directions for four quarter-turns.  


To begin the pattern, turn all the cards so it has A & D at the top, like the image above.  This is the "home" position.  To better keep track of this, I have colored the AD side of the card blue with a permanent marker (the opposite side, the BC side, is colored red--I'm big on visual cues!).  Throw your shuttle and turn the cards one quarter-turn toward you.  Do this for four quarter-turns away from you, then for four quarter-turns forward (toward you), throwing the shuttle after each quarter-turn, just to anchor everything together and adjust your tension.

Then you can start splitting the deck!  The cards now will turn in groups in opposite directions for four quarter-turns.  First separate the cards into groups.  Slide the cards 1 & 2 toward you, 3-5 away from you, 6 & 7 toward, 8-15 away, 16-17 toward, 18-20 away, 21-22 toward.  See the picture above?  That's how it should look.

Now the cards will turn in the direction that they have been placed.  The cards closest to you will turn towards you; the ones further away will turn away.  Turn all cards a quarter-turn and throw the shuttle.  Turn another quarter-turn and all the cards will have the red side facing up.  Throw the shuttle.  Make two more quarter-turns, continuing in the opposite directions, throwing the shuttle between, until the cards are back to the home position again.

Once at the home position, all the cards will turn together for four quarter-turns.  Since the first two cards were turning *forward* in the last round, all the cards will turn *forward* in this round.  Turn toward you for four quarter-turns, throwing the shuttle between each quarter-turn.

Then, back to the split deck.  Repeat and you will see the ram's horns appear!  Yes, you will see a dimple after each repeat.  Don't panic!  When you switch directions, a tiny hole appears in the middle and the weft shows through.  If you don't want the dimple, you can change your weft thread to match the middle, but then it'll show on the border, unless you also change the border color to match.


So, in brief, here's the turning directions:
1.  Turn all the cards four quarter-turns FORWARD, throwing the shuttle between each quarter turn.  End in the home position.

2.  Slide cards 1-2 forward, 3-5 back, 6-7 forward, 8-15 back, 16-17 forward, 18-20 back, 21-22 forward.  Turn cards 1/4 turn in opposite directions (forward cards forward; backward cards back).  End in home position.

Repeat steps one and two to your heart's content!

The observant weaver will note that since some of the threads are always turning forward and the rest turn forward four and backward four, that some of the threads are going to build up a great twist in it.  This will shorten the warp length for those threads, but not the rest, causing tension issues.  Some people have tried (with varying success) to use fishing spinners that will untwist the threads as you go.  This is great if you're doing backstrap weaving or have a long span that your warp is spread out, but I use this inkle loom and the twist builds up between the cards and the first or second peg and stops there.  You *can* move the twist down the entire length, around each of the pegs to get the spinners to untwist, but it's time-consuming and can be frustrating.

The other thing you can do is carefully untie the threads that are twisted, untwist them, and re-tie...it's time-consuming and can be frustrating.  I've done it...a couple times.

But the other option is to change directions to untwist every few repeats.  You could do every horn, every two horns, six horns, eight horns...whatever you desire.  The question is, at what point in the pattern do you change directions?

In this pattern you were repeating steps 1 and 2, now you have to take steps 3 and 4 to go the opposite direction!

3.  Slide cards 1-2 back, 3-5 forward, 6-7 back, 8-15 forward, 16-17 back, 18-20 forward, 21-22 back.  Turn cards 1/4 turn in opposite directions (forward cards forward; backward cards back).  End in home position.

4.  Turn all cards for four quarter-turns back.  End in home position.

You will repeat this pair of steps until the twist builds up in the opposite direction.  Then you'll change directions again, finishing step 4, then going back to step 1 and 2.

Now you can weave your Ram's Horns and show your Advanced Card Weaving skills to all your friends!

Good luck!
Elewys of Finchingefeld, GdS, JdL
Barony of Aquaterra, Kingdom of An Tir