Who Am I? And Why Am I Here?

Elewys of Finchingefeld, GdS, JdL
Barony of Aquaterra, Kingdom of An Tir

This is a place to which I may post my research, my experiments, my successes...and yes, my failures...for medieval re-creation and research on my never-ending quest to learn and revel in knowledge and experiences.

I am a lady of many times and many places. Currently using a 15th century English name, dressing in a 10th century Danish dress, and camping in a Mongolian round house. "Lost" doesn't even begin to describe my persona.

Thursday, January 1, 2015

Beginning Card Weaving: Getting Started


Card Weaving (aka Tablet Weaving) is an older-than-you-think weaving technique of making narrow bands or finished edging on other woven goods.  It's been found in Egyptian digs and Iron Age Finnish digs--and that's a lot of geography in between!

While it would be fun to go into all the history and things, you can find all that elsewhere, like here, and here, and any number of available books on the market.

But I'm here to provide you with a step-by-step guide to starting your first tablet weaving project (or offer a refresher course if it's been a while).  I've got two different projects going on in these photos...I apologize if this is confusing.

First you may need a quick overview of some of the weaving terms.
Warp - the threads that run the length of the work--on a bolt of fabric, it would be the 15 yards' length
Weft - the threads that run back and forth through the warp for the width of fabric.
Cards / Tablets - same thing.  Four- or six-hole cards for weaving.
Shuttle - item the weft threads are wrapped around and is used for beating rows of weaving
Beating - the pressing down of each pass of the shuttle to compress the threads
Shed - opening between the top and bottom threads through which the shuttle passes.
Turning - changing the shed with the cards by rotating 1/4 turns

The supplies are rather simple:
  • 2 to 3 colors of carpet warp or crochet cotton thread, high contrast--light, medium, dark. You can pick up crochet cotton pretty cheaply at just about any craft store.  Michael's, JoAnn's, Walmart...whatever is closest to you. There are also several online options, like yarn.com, dickblick.com and greatnorthernweaving.com.  
  • 4-hole cards which can be purchased here, or here in packs of 25, or you can make your own here.  I've seen people make them out of playing cards or cereal boxes or even bar coasters, but just be sure that the holes punched in them all line up.
  • A loom.  This is the trickiest bit.  Some people like to have a backstrap loom, which means you anchor it to your waist by a belt then another fixed point, like a doorknob or a railing.  This rather limits mobility, especially if you can only weave for a few minutes here and there, so others prefer to use a loom.  Inkle looms are popular, especially if you are also interested in inkle weaving (two-shed weaving with heddles instead of cards).  
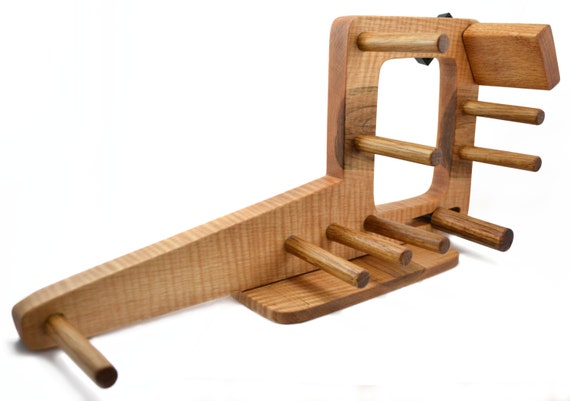

Mini Inkle Loom, Tablet Weaving, Card Weaving Loom With Double Tension System - Handcrafted From Solid Maple & Red Oak - 15 Inch<--- Some are miniature and only weave a couple yards of very narrow or delicate bands...
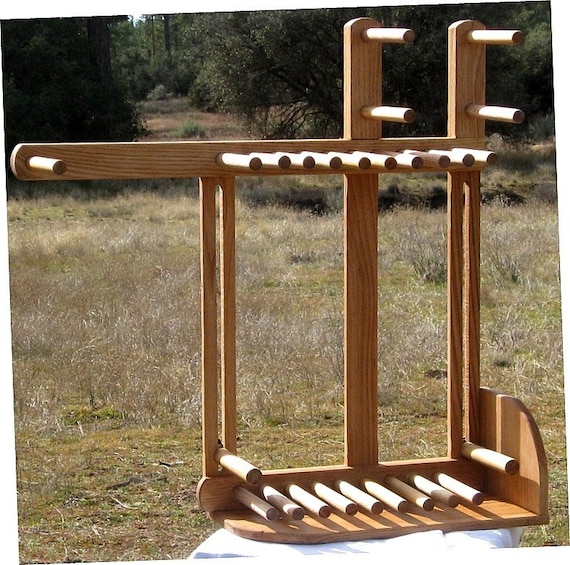
Card / Inkle weaving loom - 100 percent red oak/maple/walnut/cherry 18 yard warp
<---...others are enormous and can weave 18 yards or more of serious trim.  Note that there are *two* sliding tension bars!

There are ways to create some simple loom systems that involve clamps and 2 x 4s...you'll have to do some research on the internet or Pinterest and find a loom system that will work for you.  There are plans to make a quick-and-dirty loom from PVC for about $10.

For a first weaving project or for testing new patterns, I would recommend starting with short lengths; try a one-yard project.  If, after warping up 18 yards of a Loomzilla, you may decide that you hate the pattern and it'll take forever to take it apart and could result in yards of wasted materials.  I warped up a loom for four yards of a brocade weaving project that I abandoned about 10" in.  Luckily, I was able to use the thread for a 3 yard weaving project later.

If this is your first project, starting with something simple is the way to go.  This is a nice one from the Evil Queen of Spades on DeviantArt.com (sorry it's blurry):


If you follow the link, you will see she's got a number of great patterns with both 4-hole and 6-hole cards (which, for beginners, is more advanced card weaving that you don't need to get involved in yet).  I have tried several of them and love the way you can make it very different just by changing colors.  Most look just like this pattern above--no card or hole numbering.  I'll help you bridge that gap.

I did this up on Excel, which is how I do a lot of my patterns.  Some people like to use GTT or the Loomybin, but I've had difficulty getting them to work for me.  It's not the programs' fault--I'm just not that computer-savvy.


As you can see from this pattern, this one needs 12 cards. You will warp it up with the #1 card on the left, the #12 card on the right, just like reading a book.  Number all your cards on the backs, 1-12 (in pencil). This will help you keep them organized.

The front of the cards have four holes, labeled A, B, C and D.  Each hole will have one string in it; four strings per card.  If you look above at the pattern, each square represents one thread.  On Card 2, hole A is yellow, B is yellow, C is pale blue, and D is green; that's four threads running through one card.

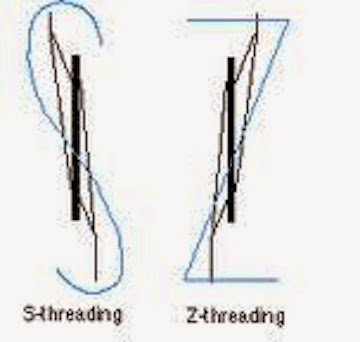
The next logical question is "what is S and Z under the rows?"  This is the way each card is threaded.  This makes the threads angle inward or outward to create a pattern.  It can make a difference between a wiggly line and a fuzzy line on your band.  When you thread the card, all the threads must go through the card the same way--you can't have some of them S threaded and some Z threaded.  That just won't work.

As you can see from this diagram (the card is the dark line in the center), S threading has the threads going from the back of the loom through the card from left to right.  Z threading goes from right to left.
Z and S Threading for tablet weaving

  
So above are two pictures:  the left is S threaded--the threads go from the top peg through the front of the card...the right is Z threaded--the threads go from the top peg through the back of the card.

Warping board:
If you are using a warping board, you will need 18 dark strands, 20 medium strands, and 10 light strands of string.  Since I use an inkle loom, I warp as I go, so I don't need to pre-cut any threads.

Warping:
If you are using an inkle, move your tension rod to the longest position.  On my loom, because it has a switch-back, it's to the far right.  (PS - the green elastic on there is to hold my shuttle during transport...this isn't an essential part of the loom.)

Lazy Kate:
In order to more easily pull threads to warp your loom, you may want to construct a Lazy Kate.  There are some fancy ones out there that you can buy, but I went the quick-and-dirty route by using a cardboard box and a 1/2" dowel.  Punched a couple holes in the box with a pair of pointy scissors, threaded the dowel through, and boom!  Lazy Kate.
With all the spools on the Lazy Kate, you can pull all colors at once, saving precious time.


As I said, you will warp it up with the #1 card on the left, the #12 card on the right, and you will have the the top surface of the cards (with ABCD) facing left.  If you have the cards facing right, the pattern will show up on the bottom of the weaving.  Also, note that the pattern is lettered DCBA from top to bottom.  If your pattern is written up as ABCD, the cards will have to face right...but that's notes for future pattern.

Tying the ends.
When I warp my loom, I leave long 3" tails for each thread.  I put all four threads for one card together and tie the beginning and ends in a square knot.  If there is an issue with one thread being too loose or breaking, you can much more easily fix it by isolating that one card and fixing the problem.  Tying them individually can also create tension problems and mean four times as many knots in the end.  Remember back to your Girl Guide or Scouting days--right over left and under, left over right and under.

Actually, I like to use a surgeon's knot, which is left over right and under twice, then right over left.  This helps secure the knot and also makes untying the knots easier at the end.  The warp needs to be taut, but you don't need to pull the warp super-tight.  Too much tension on the warp can warp your pegs...so to speak.

Once all the cards are threaded and the tension looks even, it's time to begin!


Notes on shuttles.
Shuttles can be just about anything you want to use.  I've used wooden rulers to hand-carved shuttles by masters of the craft.  As long as it's rigid, does the job, and is comfortable for your hands, it's all good.  Bonus:  wooden rulers can be found for under a buck.

Wind several yards of weft threads (that's the name for the thread that goes from side to side--or from wight to weft...as I say...) onto your shuttle.  Generally speaking, you will want to use the same color thread as the threads on the #1 and #12 cards (or whichever is the last card on the right).  This will help blend the weft into the edges so any little mistakes in tension won't be glaringly obvious.

Turning the cards.
For this pattern, all the cards will turn 1/4 turn in the same direction.  After four quarter-turns, you will reverse the direction and weave in the opposite direction.

As you can see in this image, I have colored one edge of the cards with a red permanent marker--this is the BC side.  On the opposite side, the AD side, I have colored the edges blue.  This helps you make sure you know where you are during the weaving process.  The blue edge, when A and D are on the top, is the "home" position for many patterns.  You can, of course, reverse directions at any time, but if you are going for a repeating pattern, knowing the home position is important.


Pass the shuttle through the shed (the opening between the upper and lower threads), and pull the thread down towards the knots on your warp.  Turn all the cards 1/4 turn and pass the shuttle again.  Press down--beat--with your shuttle.


You'll note that there's a little loop on the right side--this is left back to help maintain good tension.  You don't want to get wobbly edges, so when you weave follow these steps:

*  Pass the shuttle, leaving a loop behind
*  Turn the cards
*  Beat
*  Pull the weft thread to incorporate loop
*  Then repeat!

After a time, it becomes rather meditative.

Advanced Card Weaving: Birka 6: the Kivrim Band

I've been working on an "Introduction to Card Weaving" post, but ran into some technical difficulties Several hours into creation, the computer shut down, and inexplicably, the post was not saved, despite my having clicked on the "Save" button numerous times throughout the process.  I have no idea what happened, but it was a significant set back.  Images gone.  Text gone.  My mini glossary gone.  In many ways, it was almost back to the first outline I created.  Seriously frustrating.  Hopefully I can get that back up to where it was and get it posted soon.

In the meantime, I will post a quick lesson on Advanced Card Weaving.  There are many different Kivrim patterns which apparently means "Bent" (although Google Translate doesn't have the word in its dictionary for any language).  This is a split-pack weaving technique, which means that the cards will be turning in different directions, singly or in groups.  Proper threading and turning will result in some stunning patterns!  You can find several different varieties on the Loomy Bin, including the Egyptian Diagonals patterns.

This was a great lesson for me to learn how to read patterns that have no instructions--that is, those that have slashes in the boxes that change from left-leaning to right-leaning; from slash to back-slash.  I had never done such a thing before, so I feel like I made a huge leap forward in my tablet-weaving journey.

Here's an example of one of those patterns...

Muster zum Brettchenweben: Diagonalmuster - Kivrim

Looks confusing, doesn't it?  Well, my brain doesn't like looking at it.  I prefer to have it written out, which can take some time doing the translation.  I had the same issue when I was learning to knit, so perhaps in time, I will be able to look at this kind of pattern and untangle it in my head, but for now...it's long hand.

The pattern I decided on was Birka 6, one of several card woven bands found at Birka, a former trade site in Sweden which uncovered a great number of artifacts in an archaeological dig.
Birka 6
The bottom four rows are, of course, the threading diagram.  The cards are threaded DCBA, so face those cards left!  I chose two colors, a dark burgundy red and pale yellow for my project.

Looking at the diagram, you will see the first six cards are Z threaded, and the last five are S threaded.  Here's a great diagram to remember how Z and S threading works:
Z and S Threading for tablet weaving
If you're weaving along with me, go ahead and get out your thread, your cards, your loom, and warp up your cards!  I'll just go make a cuppa and meet you back here....

Ready?  Great!

Through experimentation, I discovered that you start this pattern with the AD position on top.  For the first four quarter-turns, you turn the cards away from you, which will form the V formation as you see in the threading diagram.  We'll call this motion "Forward" (since it appears to be the industry standard, although it feels backward in my mind...).  This first few rows will, of course, look sloppy and messy...as an experienced weaver, you know it always does at the beginning!

The next phase is looking at the boxes where the slashes change direction--that indicates a reverse in the card direction.  The author of this image made dark lines every two rows, which conveniently points out that the pattern of card-turning changes every two rows.  You will turn the cards two quarter turns, passing the shuttle for every quarter-turn, then adjust your cards for the next two rows.

Here is what I charted out (and you'll forgive me for not following the pattern exactly and changing directions of the first and last cards on the selvage--I never liked the idea of two cards constantly twisting up in one direction while the others moved forward and back equally.  It does make the edges a little more rough, so if you want smooth edges, turn them only forward and you can always reverse to only backwards after a while.)  These directions are written so each "turn" is a quarter-turn of the cards, and the shuttle is thrown every quarter-turn.

A)  Turns 1-4:  turn all forward
B)  Turns 5-6:  1-6 Forward; 7-8 Back; 9-11 Forward
C)  Turns 7-8:  All Back
D)  Turns 9-10:  1-6 Back, 7-8 Forward; 9-11 Back
E)  Turns 11-12:  1-3 Forward; 4-6 Back; 7-11 Forward
F)  Turns 13-14:  1-5 Forward; 6 Back; 7-11 Forward
G)  Turns 15-16:  1-3 Back; 4-6 Forward; 7-11 Back
H)  Turns 17-18:  1-5 Back; 6 Forward; 7-11 Back
I)  Turns 19-20:  All Back


If you are doing the edges all one direction, the directions are:
A)  Turns 1-4:  turn all forward
B)  Turns 5-6:  1-6 Forward; 7-8 Back; 9-11 Forward
C)  Turns 7-8:  1 Forward; 2-10 Back; 11 Forward
D)  Turns 9-10:  1 Forward; 2-6 Back, 7-8 Forward; 9-10 Back; 11 Forward
E)  Turns 11-12:  1-3 Forward; 4-6 Back; 7-11 Forward
F)  Turns 13-14:  1-5 Forward; 6 Back; 7-11 Forward
G)  Turns 15-16:  1 Forward; 2-3 Back; 4-6 Forward; 7-10 Back; 11 Forward
H)  Turns 17-18:  1 Forward; 2-5 Back; 6 Forward; 7-10 Back; 11 Forward
I)  Turns 19-20:  1 Forward; 2-10 Back; 11 Forward

When the cards have twisted too far in one direction and it starts to affect your tension, reverse the cards 1 and 11 to Back, which will untwist them.  When they are twisted too far in the opposite direction, start turning forward again.
Here's the finished piece!  It's only 5' 6" (not quite 2 feet), but since it was a test piece, I didn't want to make a full-length 4-yard piece if I didn't find it fun or workable.

I hope these instructions help you to make your own Birka band.  Good luck!  I hope to see lots more period pieces made and displayed on garb at upcoming events!

Monday, December 22, 2014

End of Year Goal Report Card

Just under 12 months ago, I made a list of challenges for 2014.  How'd I do this year?
  • Completing a Scholar Rank Costumer's Guild challenge.  Tudor woman and Viking man
    • Nope.  I gathered a few resources and made some plans, but didn't actually start any costuming projects this year except for a coif pattern for my head.  While this doesn't seem like much, it's something.  Grade:  C
  • Have the Aquaterra Costumer's Guild to fill in to promote and administer challenges, and maybe even host costumer gatherings at Kingdom events.  
    • Talked to them, but nothing was actually done.  It didn't help that the Costumer's Guild officer had a baby this year, so many things were put on the back burner.  Grade:  C
  • Build a loom based on a pattern I bought several years ago.  It doesn't have to be perfect, just usable.  I already have a rigid heddle meant to be used with this pattern...I just need the frame.
    • I looked at the plans, but didn't get any further than that.  I keep hoping that my husband will decide to make it for me.  Grade:  F
  • Sheep to shawl project.  
    • OK...I got a fleece, washed a bunch of it, and started spinning!  I got one spool done and then stalled on that project.  Grade:  B
  • Make cheese.  
    • Dear Husband got me a cheesemaking kit.  I opened it up and looked at the contents.  Grade:  D
  • Make rush lights.  
    • Maybe in 2015.  I will need to get some sheep fat (buy some lamb and extract the fact from the cooking process) and find some rushes.  I've seen them growing here and there, so just sourcing them may take a bit of time...maybe at one of the local parks with swampy waters nearby.  Grade:  F
  • Teach more.
    • I taught a couple of short classes through the A&S social meetings, and taught a couple classes at an Ithra in the Three Mountains area (which I didn't blog about, apparently).  Grade:  B
  • Prepare for a 12th Night display in the A&S room, and *maybe* a single entry in Kingdom A&S.  
    • I decided not to do a 12th Night entry this year.  The amount of time to prepare for such a venture was totally out of my ability to take on this year, and in July I found out that all the hotels were already sold out in the area.  It's rather remote and day-tripping from a friend's house is too far.  I will put it on the back burner for 2016.  Grade:  D
Overall, I'd say that I've gotten about a C this year for projects.  However, I did a lot of extra credit, including some beadmaking and tablet weaving, so I think I could easily say that my overall grade is higher--maybe a B+.  I'll take it.  :)

So what's on the docket for 2015?  Here are my newest goals, some of which are review from 2014:
  • Scholar Rank Viking Costume for men.  Maybe I'll use my middle kid as the recipient for the garb since my husband is not really interested in playing...even though the middle kid is a girl...she wants to do activities that require pants and shorter tunics.  
  • Loom building (box loom and rigid heddle loom)
  • Warp Weighted Loom--weave something!  I have it mostly warped up, but it needs weights and yarn for the weft.  I was considering buying a bunch of the Fisherman's Yarn and dyeing it with KoolAid, just for fun.
  • Sheep to Shawl progress 
  • Keep teaching.  I have a student who said, "I want to learn how to do everything you're doing."  I may not be the expert, but I'm happy to brain-dump.
  • Cheesemaking.  Start with the kit, then move on to other cheeses.
  • Dye with natural dyes - woad, sandalwood.  I have a big spool of linen threads around here that I can use to dye stuff with.  I'd love to grow the woad myself, but I guess it's illegal in this state. :(
  • Tablet weaving - Birka reproductions
  • Decorate yurt door with Turkish designs
  • Replace and repair and enhance old pieces from my wardrobe.
That's 10 things.  That aughta hold me for now...right?  Then I'll "ooo-shiny!" and start a project not on this list.  Like stained glass or something.

Friday, December 19, 2014

Lazy Kate for Elewys

Frustrated with spools of thread bouncing all over the place or having to keep the spools in bowls that inevitably tip over, I decided to make myself a cheap Lazy Kate.  At first, I looked at the scrap lumber I had sitting around and wondered if I could find a drill bit, and where I would find the nails, and setting up the table saw to cut things....and then decided to make it a bit simpler.


Here's what I did...

Found a box in the garage from our most recent shipment of medical supplies.  We get a good half-dozen of these a month, so there's no shortage here, in a variety of sizes and shapes.  I picked a smallish one.


I found a 1/2" dowel in the wood shop, just the right size to fit through the center of the spools of carpet warp.

Poked a hole about 2 inches down from the top edge of the box large enough to fit the dowel in.


Threaded the dowel through and eyeballed it so it was relatively straight and level, and pressed down on the cardboard on the opposite side of the box.


Used the scissors to make the hole on the other side, and threaded the dowel through.

Mounted the spools onto the rod, which greatly increased the speed at which I could warp my loom!

Friday, December 5, 2014

Advanced Card Weaving: Ram's Horn Pattern

I've been watching a card weaving Facebook page and several people have asked about how to do the Ram's Horn pattern.  It's not a beginner's pattern, for sure, but with an understanding of how the cards are set up and turning patterns of the cards, you, too, should be able to produce a lovely woven Ram's Horn band.  Sounds easy enough, right?  Don't worry--go step by step, and you'll have this one by the horns!

Now, it should be noted, for those who are big into the recreationist groups like the SCA, this is not a period piece.  Historically, the only mention I can find is from a web site that reads:  "The Ram's Horns pattern popularlized by Crockett's "Card Weaving" book comes from the 20th century Anatolian (turkish) belts and it has not equivalent in archeological finds."  http://weavedmagic.deviantart.com/journal/Origins-of-most-popular-tablet-weaving-patterns-394709084

So let's get to the full color demonstration of this pattern!  READY?

If you're not sure if you're going to like it, or if you suspect you might get frustrated from trying and pitch it across the room, you may want to try a short piece first. Don't warp up the loomzilla for this first project.  When I first tried this pattern, I did one-yard lengths for each thread, just to test it out.  I ended up getting about a foot done before I knew I needed to do a larger piece!

Supplies needed:

  • 3 colors of carpet warp or crochet cotton thread--I used Maysville 8/4 Carpet Warp.  It's good stuff, heavy duty and will make great belts, bag straps, and heavy trim (it's not delicate and as flexible as finer threads, but a great place to start).
  • 22 cards--mine are the store-bought 3" cards with ABCD labeled in clockwise order
  • 1 loom--I use an inkle loom that weaves up to 4 yards of trim
When choosing the thread, you will need a light color, a medium color, and a dark color.  High contrast is important in this pattern!

You will warp it up with the #1 card on the left; #22 card on the right, reading the pattern just like reading a book.  The next thing to note is that, for this pattern, you should have the top surface of the cards facing *left*.  If you have the cards facing right, the pattern will show up on the bottom side of the weaving.  Also, and the pattern (below) has the rows lettered backwards--D, C, B, A.  (If they were lettered A, B, C, D, you would have to face your cards to the right--good tip to note for when you find future patterns!)

This is the pattern for the dreaded Ram's Horn pattern.


Just a refresher:  Each column in the pattern is marked with S or Z.  Some patterns will be marked with \ for S or / for Z, but since this font doesn't have a significant slant, it can look a bit more confusing, so I've used the letters instead.  Many new weavers get confused about how to do S and Z threading.  This is one of the best diagrams I've found to remind yourself how the threads go through the cards.  

Now you've got the pattern, the threads, the cards, and a refresher on S and Z threading.  Go ahead and thread up your loom...I'll wait.  (I often put in a movie that I've seen a dozen times so I have something to listen to while I work.)

[dooo-do-dooooo...deee-daaah-dee....]


OK.  Now your loom is threaded and you have a shuttle loaded (I recommend using the same color as the thread on the border--in this case, a dark red--to make it blend in, but some people like to make it stand out as an added pattern on the edge.  Your choice!)  Ready to start?  

The pattern alternates between the cards moving together, as a pack, for four quarter-turns, and then some of the cards turning in opposite directions for four quarter-turns.  


To begin the pattern, turn all the cards so it has A & D at the top, like the image above.  This is the "home" position.  To better keep track of this, I have colored the AD side of the card blue with a permanent marker (the opposite side, the BC side, is colored red--I'm big on visual cues!).  Throw your shuttle and turn the cards one quarter-turn toward you.  Do this for four quarter-turns away from you, then for four quarter-turns forward (toward you), throwing the shuttle after each quarter-turn, just to anchor everything together and adjust your tension.

Then you can start splitting the deck!  The cards now will turn in groups in opposite directions for four quarter-turns.  First separate the cards into groups.  Slide the cards 1 & 2 toward you, 3-5 away from you, 6 & 7 toward, 8-15 away, 16-17 toward, 18-20 away, 21-22 toward.  See the picture above?  That's how it should look.

Now the cards will turn in the direction that they have been placed.  The cards closest to you will turn towards you; the ones further away will turn away.  Turn all cards a quarter-turn and throw the shuttle.  Turn another quarter-turn and all the cards will have the red side facing up.  Throw the shuttle.  Make two more quarter-turns, continuing in the opposite directions, throwing the shuttle between, until the cards are back to the home position again.

Once at the home position, all the cards will turn together for four quarter-turns.  Since the first two cards were turning *forward* in the last round, all the cards will turn *forward* in this round.  Turn toward you for four quarter-turns, throwing the shuttle between each quarter-turn.

Then, back to the split deck.  Repeat and you will see the ram's horns appear!  Yes, you will see a dimple after each repeat.  Don't panic!  When you switch directions, a tiny hole appears in the middle and the weft shows through.  If you don't want the dimple, you can change your weft thread to match the middle, but then it'll show on the border, unless you also change the border color to match.


So, in brief, here's the turning directions:
1.  Turn all the cards four quarter-turns FORWARD, throwing the shuttle between each quarter turn.  End in the home position.

2.  Slide cards 1-2 forward, 3-5 back, 6-7 forward, 8-15 back, 16-17 forward, 18-20 back, 21-22 forward.  Turn cards 1/4 turn in opposite directions (forward cards forward; backward cards back).  End in home position.

Repeat steps one and two to your heart's content!

The observant weaver will note that since some of the threads are always turning forward and the rest turn forward four and backward four, that some of the threads are going to build up a great twist in it.  This will shorten the warp length for those threads, but not the rest, causing tension issues.  Some people have tried (with varying success) to use fishing spinners that will untwist the threads as you go.  This is great if you're doing backstrap weaving or have a long span that your warp is spread out, but I use this inkle loom and the twist builds up between the cards and the first or second peg and stops there.  You *can* move the twist down the entire length, around each of the pegs to get the spinners to untwist, but it's time-consuming and can be frustrating.

The other thing you can do is carefully untie the threads that are twisted, untwist them, and re-tie...it's time-consuming and can be frustrating.  I've done it...a couple times.

But the other option is to change directions to untwist every few repeats.  You could do every horn, every two horns, six horns, eight horns...whatever you desire.  The question is, at what point in the pattern do you change directions?

In this pattern you were repeating steps 1 and 2, now you have to take steps 3 and 4 to go the opposite direction!

3.  Slide cards 1-2 back, 3-5 forward, 6-7 back, 8-15 forward, 16-17 back, 18-20 forward, 21-22 back.  Turn cards 1/4 turn in opposite directions (forward cards forward; backward cards back).  End in home position.

4.  Turn all cards for four quarter-turns back.  End in home position.

You will repeat this pair of steps until the twist builds up in the opposite direction.  Then you'll change directions again, finishing step 4, then going back to step 1 and 2.

Now you can weave your Ram's Horns and show your Advanced Card Weaving skills to all your friends!

Good luck!
Elewys of Finchingefeld, GdS, JdL
Barony of Aquaterra, Kingdom of An Tir

Wednesday, June 25, 2014

Sheep to Shawl: Phase I

I have started to make some progress on my Sheep to Shawl project, turning raw fleece into a wearable garment.  I started some months ago by getting a bag of raw fleece from my friend, Godith of Goosefoot Mead.  She used to raise sheep up in Shittimwoode, a few miles from where I used to live, and entered the fleeces into the local fair and won ribbons for its quality.


This is from a sheep named Sprite from the sheering about 8 years ago.  She's been holding onto several fleeces for all these years and was happy to give it a new home for this endeavor.  Thanks, Godith!!
Sprite was a Romney-Border Leicester cross and she grew some really nice long-staple locks.  When cleaned, it's just lovely, isn't it?


However, before it got to this lovely, white color, the fibers had to be cleaned.  This is the gross part.  It's full of burrs, grass, hay, and...yes...poop.  Mostly the poop is just on the edges of the fleece--the belly and bum--but the rest of the fleece is oily and dirty.  The oil is lanolin, which is the stuff they put into lotions and things, so working with this stuff will certainly keep your hands soft!

There are a few different techniques for washing fleece.  Some say use screaming-hot water (140-160 degrees F) and lots of soap (a cup of dish soap per fleece).  Others say lukewarm water and a couple ounces of soap are just fine.  I tried a few different techniques to see what worked best with this fleece.

The thing to avoid is turning your fleece into felt.  To make felt from wool you need three things:  water, heat, and agitation.  Swooshing the fibers around in screaming-hot water is the recipe for woolly disaster.  Some fleeces will felt as soon as you grab the kettle...others will withstand all kinds of abuse without felting.  The trick is to figure out what you can do without turning your lovely fleece into a nasty mess.
So first you run some water into your wash basin (sink, bucket, pot...whatever you want to use) and put some soap into the water.  You put the soap in after the water is run--you don't want suds, you just want the soap in the water, and gently swish it around.  Take a couple handfuls of the dirty fiber--you only want to wash a few ounces at a time--and pull the visible grass, burrs and poo from the fiber.
Place the fiber into the water, and press down gently.  Don't stir or agitate--just make sure it all gets wet.  Wait 10 minutes while the oils and dirt come off the hair.  Yeah, the water will look gross.  It will be an amazing change from the yellow stuff you put in to what you pull out, even after the first soak.
Carefully pull the fiber out and let the water drain out of the wool.  Pull the plug on the sink, and refill with water--same temperature as before.  If you put hot wool into cold water or vice versa, the temperature change can cause it to felt.  Poof!  Ruined wool.  Add more soap, repeat process.
You can repeat the process a couple more times, washing and rinsing the hairs, pulling any grass or seeds you find as you go.  I pinched or rubbed some of the tips to get some of the gross color out of the hairs, but it didn't all come out (the darkest bits in the lower right of this picture went back into the bath for a bit more washing).  When you're satisfied, lay it out on towels or a sheet to air dry in the shade.
Once dry, you can comb out the fibers to get it ready for spinning.  I don't have wool carders, which start at $50 and go up from there.  I opted, instead, to buy a small $7 cat/dog brush to use to comb out the fibers...see how that works.  I heard that it works, so I thought I'd give that a try first.  So far it seems to be going OK!
So now I have a pile of fluffy white stuff, ready to spin!
Heide has entrusted me with her amazing spinning wheel, which I will hopefully be able to figure out how to use.  I got a very quick tutorial last weekend and hoped enough of it stuck to be able to make some fluffy stuff into string.

Success!

Monday, March 10, 2014

Beads and Weaving Update

I've made a bunch of beads lately.  This set of 10 (11) were made for my dear friend, Heide, who wanted to make bracelets for her sister and mom.  Heide grew up on a cranberry farm near Aberdeen, so when she saw the first bead I made, she said "CRANBERRIES!" and commissioned 10.  I was happy to make them for her and threw in the 11th bead free!  OK, technically it was the first bead, and it wasn't the prettiest, but she loves them anyway.
Portrait: Reasons to be thankful... 1. Nobody was hurt in the wreck today.  2. The accident was NOT my fault and knowing I did everything possible, and had I not locked up the brakes and turned the wheel it could have ended badly. 3. My parents surprised us by showing up early.  They didn't stay long though, as they were on their way to White Salmon to stay with my Aunt Kathy and Uncle Wayne Stone. 4. They brought the girls about 50 pounds of fabric for costuming and so they could learn how to sew (that is a piece of linen from the lot under the beads in this picture).  5. The beads!  These are special beads I commissioned from Karen that feature cranberries and cranberry vines. 6. Brian cooked a lovely dinner tonight. 7. We are home, safe and cozy for the evening.
Then I was messing around with different colors and techniques, tools, and trying out some stuff with clear glass.  I don't particularly care for working with the clear stuff--it seems to need a lot more heat and takes longer to melt.
  This one I call the Diversity Bead.  :)
Portrait: Experimenting with color combinations. .. Then doing a tried-and-true red, white and black combo.    

I love the chemical reaction I had with these two colors--I need to get more turquoise.


I finally got the weave done--it's so lovely!  I don't know what I'm going to do with it...although I think it'll end up on an apron dress.

Since the loom was now free...I warped up some yarn on the inkle loom to make the band for Frigga the Loom.  I'm thinking I need to get it on the rail and start attempting to weave.  I need to figure out where to set it up in the house--probably the front room, but I need to rearrange some furniture first.

A few weeks ago, I was greatly anticipating entering Kingdom Arts & Sciences in 2015 with my warp-weighted loom--something I had never seen anyone work with in An Tir.  Last weekend was the Kingdom event and I started eagerly looking at some of the entries that starting appearing on Facebook.  I was a little discouraged to see an entry this year that included...yes, a warp-weighted loom.  My first reaction was "dang it!  I wanted to be first!"  Then it was, "Now it's going to look like I'm copying."  It was, admittedly, a little disheartening.  Now, the loom she used was for card weaving, not for fabric, but still, I felt like someone had stolen my master plan and built it faster and presented it.  I had a nice chat with my Foster Laurel (whose identity shall remain a mystery for now)...she has been a great sounding board when I have questions or get discouraged on my Artisan Journey (let's not say Laurel Track...who the hell knows where this journey will end?).  I relied on her greatly when I had a personal issue with another member, when I had frustrations with a judging panel, and yesterday, when I was stung by the surprise of someone else doing stuff with the loom.

After she talked me down off the ledge, and I had a night to sleep on it, I realized that my journey and her journey may cross paths, but we are on different journeys.  Hers was to do card weaving on a warp-weighted loom; and mine is to make a sheep to shawl project.  I even have the sheep!


Many thanks to HL Godith of Goosefoot Mead for providing this bag of goodness!  This award-winning fleece needs to be washed, carded and spun and will -- hopefully -- be a finished garment someday.  

Away to bed...long day tomorrow!  I have two quilts to finish for other people, and on Friday, I get to pick up two more.  In the meantime, I have 7 to do for myself.  Gaaaaahhh!

G'nite.